gluten free, egg free, nut free \
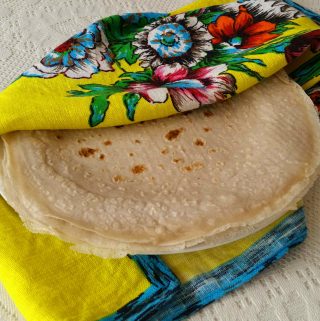
These Buckwheat Blender Wraps are delicious, soft and flexible. They have a nice "grip" and are less dry than tortillas for example. I've got to admit here that I find store-bought gluten free wraps are much like tasteless cardboard that break apart with minimal contact. No wonder many people think gluten free products are awful! To me, this is such a shame as I feel that gluten free cooking can open up a world of interesting new, nutritious ingredients like the buckwheat flour I use in this recipe and in many others.
My instructions are detailed, but these are very easy to make. Please note the size is smaller than burrito-sized wraps, so I suggest not overfilling them - serve two for each adult rather than one. Salad leaves (esp. ones with big stems) and cabbage tend to take up a lot of space as a filling, so be careful not to use too much of these or the wrap may break a little. The gelatin in the recipe is essential as a binder and gives the wraps some extra strength without making them brittle.

Buckwheat Blender Wraps
Ingredients
- 4 teaspoons gelatin powder non-hydrolysed
- ¼ cup hot water
- 2 ¼ cup room temperature water
- ⅓ cup light-flavoured olive oil
- 1 ¼ cup buckwheat flour
- ½ cup tapioca flour
- 1 teaspoon fine sea salt
Instructions
- Start by preparing the gelatin. First, boil the ¼ cup water and let it cool for a few minutes. Place the gelatin in a bowl, add the water and whisk or stir with a fork. Remove any lumps.
- Place the oil and water in to the blender, followed by the gelatin mixture (use a spatula). Finally, add the dry ingredients.
- Blend everything for a few minutes until smooth. Take the lid off the blender, scrape the sides down with a spatula (to get all the flour off and in to the mix) and blend again briefly.
- Heat the pan on med-high heat (if your pan tends to get very hot, use a medium setting). Lay out the clean tea towels on a bench.
- Once the pan is hot, use ⅓ cup of the batter for each wrap. You can pour the mix in to the cup measure to do this, or scoop the mix from the blender. Unless using cast iron, I don't recommend using any oil in the pan as it sometimes prevents the wraps from setting properly.
- Pour measured batter into the pan, and immediately swirl the mix around the pan to cover it completely, using wrist action. The faster the better!
- Try not to have any gaps, but if you do, then add a tiny bit more mix to fill in the gaps (the measuring cup often has a few drops left in it which can be used to fill in gaps).
- After 2-3 minutes (or the corners have curled up from the sides) very carefully lift a little of one side of the wrap with a finger and then slide the egg lifter underneath all the way to the middle. The idea is to flip it very quickly so it doesn't get stuck halfway during the flip. Practice makes perfect! If it breaks, it probably needs a little longer before flipping. Careful not to overcook as they will be more prone to breaking.
- Cook the other side for 2 minutes and then remove. Place the wrap on a clean tea towel to let cool. I don't recommend paper towel as they may stick.
- Repeat steps 5 to 8 and let the wraps cool down before using.
- When using the wraps, be careful not to overfill or use overly wet ingredients. It's a good idea to place some lettuce first in the spot you will be placing your ingredients to prevent the wrap getting soggy.
- To store in the fridge: separate using tea towels (I don't recommend paper towels as they stick). Place one wrap on a dinner plate and then use a folding method to separate each wrap with tea towels. By using ¼ of the space of each tea towel and folding over each wrap, you can fit 4-5 wraps per tea towel (ie. place wrap on tea towel section, fold over, place another wrap, fold over and so on). Once all wraps are separated, cover the plate with wraps with a plastic or cloth bag, then wrap tightly. They will keep for around 2 days. Any longer and I suggest freezing them, as they do dry out in the fridge and become more prone to breaking.
- To freeze: these wraps can be frozen flat on a parchment-lined baking (cookie) sheet. Place them individually (no stacking) and freeze. To store in the freezer, use greaseproof paper (or similar) to separate each one, then wrap in a bag and store between two flat items (eg. puff pastry packets or baking sheets). They need to be handled with care when frozen. They take around ½ hr to defrost and then need a bit of re-heating as mentioned above.
- To re-heat: spray/sprinkle first with a little water, then microwave for 10-15 seconds until warm or re-heat in a pan on low heat.
Notes
- If using a cast iron pan, you will need to spray the pan a little with some oil
- Ensure to use non-hydrolysed gelatin powder, for example the red tin of Great Lakes brand
- Equipment: Small mixing bowl, fork, whisk, spatula, egg lifter, measuring cups, two-three clean tea/kitchen towels, one or more large non-stick frypans, blender (any blender will work)


Leave a Reply